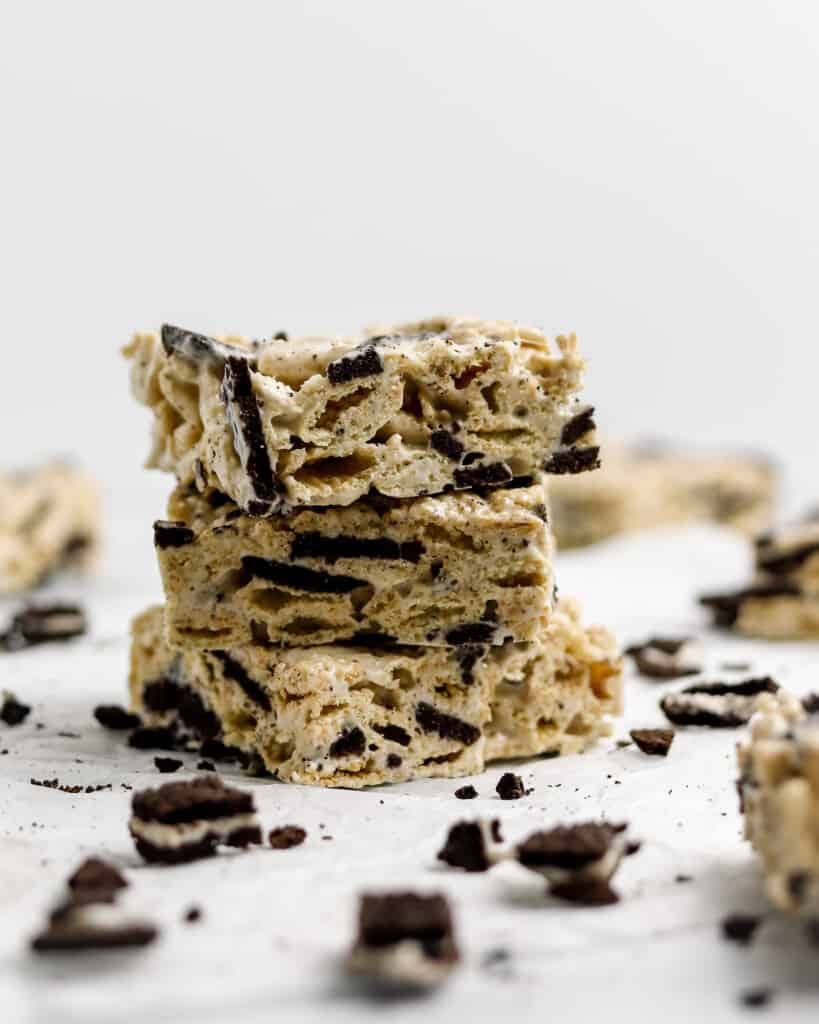
Gluten free Oreo rice krispie treats made with gluten free Oreo cookies, crispy rice Chex cereal, nutty brown butter, and lots of marshmallowy goodness. They’re super easy to make and the perfect quick dessert to bring to parties, bbq’s or for any time you’re in the mood for something nostalgic and sweet.

The ultimate no bake dessert, these gluten free Oreo rice krispie treats are an upgraded version of your favorite classic treat. The only thing better than a good ol’ rice krispie treat is one that’s loaded with gluten free Oreo cookie chunks, lots of gooey marshmallows, caramelly brown butter, and of course, gluten free rice cereal.
What you’ll need to make these Gluten Free Oreo Rice Krispie Treats
(links below are the gluten free & celiac safe products I used in this recipe)
- unsalted butter
- gluten free marshmallows
- pure vanilla extract
- fine sea salt
- gluten free Oreo cookies
- gluten free Chex rice cereal

First of all brown butter is THE BEST and seriously takes these rice krispie treats to the next level. It gives them a rich, caramel-like nutty flavor that pairs perfectly with the sweet, ooey gooey marshmallows and chocolatey Oreo cookies. And it only takes a few minutes to brown the butter before adding in the marshmallows so DON’T SKIP THIS STEP! I’m telling you, the brown butter makes these rice krispie treats incredibly delicious and so irresistible. You’re in for a real treat!
What exactly is brown butter?
Brown butter is the result of cooking down butter until it turns a deep caramelly brown color and gives off a rich, nutty flavor and aroma. As the butter cooks, the milk solids are toasted and begin to carmelize, leaving a rich, sweet flavor that’s irresistibly delicious.
Is Kellogg’s rice krispie cereal gluten free?
The short answer, no. Kellogg’s rice krispie cereal is made with malt flavoring, derived from barley, which is not gluten free. But no need to worry. I’ve been making gluten free ‘rice krispie’ treats for the past 12 years and have found that Chex rice cereal actually makes a better ‘rice krispie’ treat. The Chex rice cereal is crispier than Kellogg’s rice krispie cereal and adds more texture to the treats, but more importantly, it’s gluten free!
More delicious gluten free sweet treat recipes you’re sure to love!
- Sea Salt, Honey, and Dark Chocolate Chunk No Churn Ice Cream (Gluten Free)
- Gluten Free Lemon Bars with Almond Shortbread Crust
- The Best Gluten Free Vegan Allergy Friendly Brownies
- Gluten Free Greek Yogurt Cheesecake with Granola Crust
If you make these Gluten Free Oreo Rice Krispie Treats, be sure to leave a comment and rating below. You can also snap a photo and post it on Instagram! Make sure to tag @glutenless_apron and use the hashtag #glutenlessapron for a chance to be featured. Enjoy!

Gluten Free Oreo Rice Krispie Treats
- Diet: Gluten Free
Description
Gluten free Oreo rice krispie treats made with gluten free Oreo cookies, crispy rice Chex cereal, nutty brown butter, and lots of marshmallowy goodness. They’re super easy to make and the perfect quick dessert to bring to parties, bbq’s or for any time you’re in the mood for something nostalgic and sweet.
Ingredients
(links below are the gluten free & celiac safe products I used in this recipe)
- 10 tablespoons unsalted butter
- 20 ounces gluten free marshmallows
- ½ teaspoon pure vanilla extract
- pinch fine sea salt
- 20 gluten free Oreo cookies, roughly chopped
- 8 cups (240 grams) gluten free Chex rice cereal
Instructions
step 1
Grease a 9 x 13-inch baking dish with butter, set aside.
step 2
In a large pot, add the butter and place over medium-low heat. Once the butter has melted it will begin to crackle and foam. At this time make sure to whisk constantly. After a few minutes, the butter will turn golden brown, have a nutty aroma, and brown specks will form in the bottom of the pot. Turn heat to low, add the marshmallows, and stir until completely melted and smooth. Remove pot from heat and add the vanilla extract and salt, stir to combine.
step 3
Add the Chex cereal and chopped Oreo cookies, stir until everything is well coated with the melted marshmallows. Make sure to scrape the bottom of the pot to get everything combined.
step 4
Transfer mixture to the prepared baking dish. Press the mixture evenly into the pan using a greased spatula or spoon. Let cool for about an hour before cutting into squares.
* some of the links above are affiliate links, which pay me a small commission for my referral at no extra cost to you! thanks for the support! *
Leave a Rating + Comment